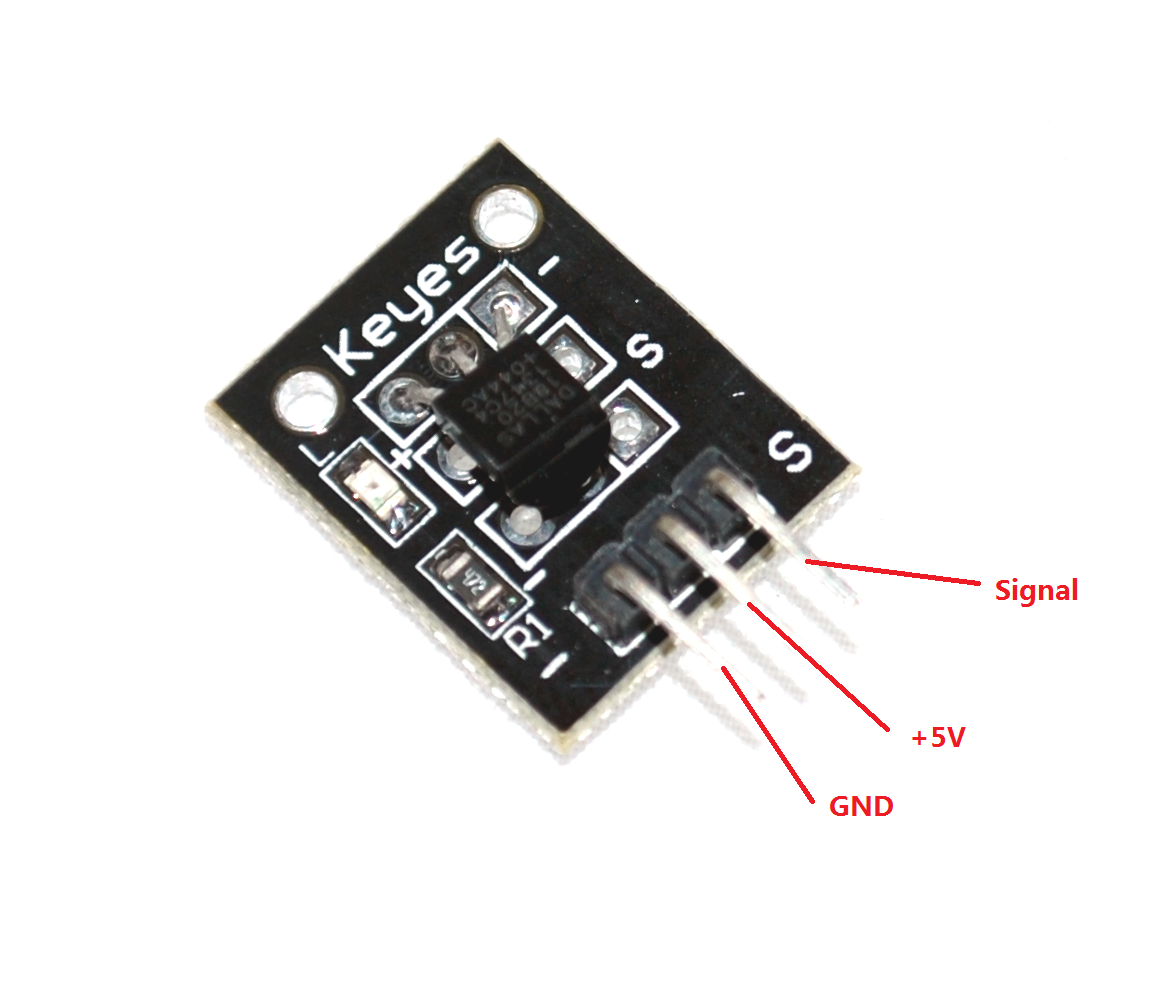
KY-001 - Temperatursensor
KY-001 - Temperatursensor
Es handelt sich um einen Dallas Onewire DS18820. In meinem Fall war die Platine falsch beschriftet! Anstatt „GND“, „VCC“ und „S“ stand da „G“, „R“ und „Y“ und entsprechend muss man die Anschlüsse vornehmen.
Spezifikation
-
Das Modul benutzt einen digitalen Temperatursensor mit single-Wire Bus DallasDS18B20, die externe Stromversorgung liegt im Bereich von 3.0 V to 5.5 V. Der Messbereich reicht von -55 °C bis +125 °C. Im Bereich von -10 °C bis +85 °C beträgt die Genauigkeit ±0.5 °C.
-
???? the temperature sensor is a programmable resolution of 9 to 12 temperature conversion to 12-bit digital format With a maximum of 750 milliseconds formula User definable nonvolatile temperature alarm settings.
-
Jeder DS18B20 enthält eine eindeutige Seriennummer und kann in einem Bus mehrfach vorkommen.
Anmerkungen (Die Übersetzung steht noch aus)
-
because the ordinary transistor DS18B20 and looks similar, we'll be sure to note when using Be careful not to regard it as a generalPass transistor used to avoid damage;
-
in order to prevent damage to the DS18B20 and makes it does not work, we should ensure that the powerLine and ground not reversed.
-
the relevant technical data on the bus did not mention a single number that can be linked to how much DS18B20, But in practical applications are not as many, and we should pay attention to.
-
there is a connection DS18B20 bus length limitations that should be taken in the long-distance communication Consider bus distributed capacitance and resistance Impact resistant.
-
instructions for use Identify DS18B20 Temperature Sensor Module power lines, ground, and data Lines, power lines, ground points connected to the Arduino test board +5 V, GND port number Data bus connected to the digital port.
Voraussetzungen
  Arduino controller × 1
  DS18B20 Temperature Sensor Module × 1
  USB data cable × 1
  download and install the OneWire libary
Anschluss
| Arduino | Modul |
|---|---|
| Pin - | connect to Arduino GND |
| Pin (middel) | connect to arduino +5V |
| Pin S | Signal, In diesem Beispiel Arduino Digital pin 10 |
Wenn alles richtig angeschlossen ist, leuchtet die LED wenn der Senso gelesen wird.
Beispielcode
#include <OneWire.h>

// DS18S20 Temperature chip i/o
OneWire ds(10);  // on pin 10

void setup(void) {
  // initialize inputs/outputs
  // start serial port
  Serial.begin(9600);
}

void loop(void) {

  //For conversion of raw data to C
  int HighByte, LowByte, TReading, SignBit, Tc_100, Whole, Fract;

  byte i;
  byte present = 0;
  byte data[12];
  byte addr[8];

  if ( !ds.search(addr)) {
      Serial.print("No more addresses.\n");
      ds.reset_search();
      return;
  }

  Serial.print("R=");
  for( i = 0; i < 8; i++) {
    Serial.print(addr[i], HEX);
    Serial.print(" ");
  }

  if ( OneWire::crc8( addr, 7) != addr[7]) {
      Serial.print("CRC is not valid!\n");
      return;
  }

  if ( addr[0] == 0x10) {
      Serial.print("Device is a DS18S20 family device.\n");
  }
  else if ( addr[0] == 0x28) {
      Serial.print("Device is a DS18B20 family device.\n");
  }
  else {
      Serial.print("Device family is not recognized: 0x");
      Serial.println(addr[0],HEX);
      return;
  }

  ds.reset();
  ds.select(addr);
  ds.write(0x44,1);         // start conversion, with parasite power on at the end

  delay(1000);     // maybe 750ms is enough, maybe not
  // we might do a ds.depower() here, but the reset will take care of it.

  present = ds.reset();
  ds.select(addr);
  ds.write(0xBE);         // Read Scratchpad

  Serial.print("P=");
  Serial.print(present,HEX);
  Serial.print(" ");
  for ( i = 0; i < 9; i++) {           // we need 9 bytes
    data[i] = ds.read();
    Serial.print(data[i], HEX);
    Serial.print(" ");
  }
  Serial.print(" CRC=");
  Serial.print( OneWire::crc8( data, 8), HEX);
  Serial.println();

  //Conversion of raw data to C
  LowByte = data[0];
  HighByte = data[1];
  TReading = (HighByte << 8) + LowByte;
  SignBit = TReading & 0x8000;  // test most sig bit
  if (SignBit) // negative
  {
    TReading = (TReading ^ 0xffff) + 1; // 2's comp
  }
  Tc_100 = (6 * TReading) + TReading / 4;    // multiply by (100 * 0.0625) or 6.25

  Whole = Tc_100 / 100;  // separate off the whole and fractional portions
  Fract = Tc_100 % 100;


  if (SignBit) // If its negative
  {
     Serial.print("-");
  }
  Serial.print(Whole);
  Serial.print(".");
  if (Fract < 10)
  {
     Serial.print("0");
  }
  Serial.print(Fract);

  Serial.print("\n");
  //End conversion to C
}- Zugriffe: 426
